Blog Archives

How To Downgrade iOS 11.2.5 To iOS 11.2.2 For Potential Future Jailbreak
Here’s how to downgrade iOS 11.2.5 to iOS 11.2.2 on iPhone or iPad in preparation for a potential future iOS 11.2.2 jailbreak.
If you thought you were perfectly happy running iOS 11.2.5 on your iPhone or iPad until you heard about the potential for an iOS 11.2.2 jailbreak, then you will be pleased to know that it is still possible to downgrade while Apple is still signing that firmware version. Follow the process below to do exactly that. Make sure your data is backed up though but do remember that full backups made using iTunes or iCloud on 11.2.5 won’t be compatible for restore on iOS 11.2.2.

Step 1: First and foremost, you are going to need to have the latest version of iTunes running on your Mac or PC. You can grab this via the Update mechanism in the software itself, or by heading to apple.com/itunes/download/ and downloading the latest version for your platform. You are also going to need to have the correct iOS 11.2.2 IPSW for your iPhone or iPad. You can grab the relevant IPSW file for your device from here: Download iOS 11.2.2 IPSW Links And OTA For iPhone, iPad, iPod touch. Once done, proceed to step 2 below.
Step 2: Launch the Settings app on the iPhone or iPad and head to iCloud > Find My iPhone and ensure that this functionality is toggled into Off position.
Step 3: Now, with those two things done, it’s time to connect the device to the PC or Mac using the supplied Lightning cable. You also need to put the device into DFU or Recovery Mode. If you don’t know how to do that, then you can find the process below for your device type:
- iPhone 7 or iPhone 7 Plus owners: Enter DFU Mode On iPhone 7 Or iPhone 7 Plus, Here’s How
- iPhone 8, iPhone 8 Plus, or iPhone X owners: DFU Mode On iPhone X / 8: Here’s How To Enter It
If you are still running an older device, such as iPhone 6s or iPhone 6 Plus, then you can use the old-school method of getting into DFU Mode, which involves holding down the Power and Home buttons together for ten seconds until the Apple logo appears and then releasing the power button while continuing to hold down the Home button until iTunes tells you that it has detected a device in Recovery Mode.
Step 4: You now need to be back concentrating on the Mac or PC. If you are using a Mac, hold down the Option key on the keyboard and click on the Restore iPhone… button in iTunes. If you are operating a Windows-based PC then it’s the Shift key that you need to hold down while clicking on the same Restore iPhone… button. Once prompted, select the relevant IPSW file from your computer.

iTunes will then go about its business getting that iOS 11.2.2 IPSW file installed on your connected device. Once it has finished, you will be left with a device running a clean installation of a firmware which will hopefully be jailbroken sooner rather than later using one or more of the Zimperium bugs when they become common knowledge.

How To Put iPhone X / 8 In DFU Mode
Here’s how you can easily enter DFU mode on iPhone X or iPhone 8 when the need arises. Instructions include step by step illustrations.
It’s probably fair to suggest that most iPhone owners who have owned that particular device over time will be familiar with putting the device into DFU (Device Firmware Upgrade) mode. As the name suggests, this mode on the device is particularly useful when wanting to troubleshoot a device or have to go through the process of updating the firmware on the iPhone.

With the announcement and release of iPhone 8 and iPhone 8 Plus, as well as the iPhone X which does away with the Home button completely, the process has changed compared to what it was on previous-generation iPhone models. So without further ado, let’s just dive right in and take a look at the necessary steps to do this, which differ slightly from the previously amended steps for iPhone 7 and iPhone 7 Plus. Make sure to familiarize yourself fully with the process before running through it.
NOTE: Before beginning, you are going to need to have an iPhone 8, iPhone 8 Plus, or iPhone X smartphone as well as access to iTunes running on a PC or Mac and the Lightning cable to connect it to the machine.
Step 1: Make sure that you connect your iPhone 8, iPhone 8 Plus, or iPhone X to a Mac or PC via the provided cable. If iTunes doesn’t automatically launch, then invoke it manually.
Step 2: Make sure iTunes is still running and your iPhone is still plugged into the machine before turning the iPhone entirely off.
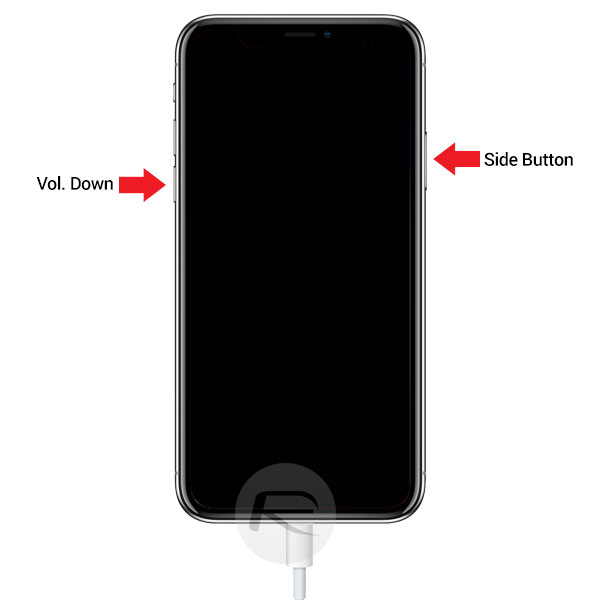
Step 3: Now, press and hold the Side button on the device for three seconds. You should get the Apple bootup screen. With the Side button still held down press the Volume Down button and hold both buttons down for a period of ten seconds.
Step 4: The bootup screen should disappear once the system has detected that these buttons are pressed for a specific period of time. After ten seconds are complete, release the Side button but continue to press the Volume Down button for an additional five seconds. iTunes should pop up an alert informing that it has found a device in Recovery mode. The iPhone screen should be entirely black at this stage.
Congrats! You have now successfully put your iPhone 8, 8 Plus, or iPhone X into DFU mode.

Enter DFU Mode On iPhone 7 Or iPhone 7 Plus, Here’s How
Here’s how you can enter DFU mode on an iPhone 7 or iPhone 7 Plus. As you may already know by now, Apple’s iPhone 7 and iPhone 7 Plus features a new capacitive Home/Touch ID button that uses the company’s proprietary Taptic Engine to provide feedback when an action has been complete instead of being mechanical like on previous iPhones.
This new Home button integration means that the process of putting both devices into DFU mode has changed slightly to accommodate the removal of the mechanical button. We’re going to run you through the new DFU mode process to allow you to familiarize yourself for when the need arises.

Step 1: First and foremost, you’re going to need to ensure that you have the latest version of Apple’s iTunes installed on your Mac or Windows-powered PC. This is something that a lot of people forget about and think that iTunes isn’t really that important. As of this writing, the latest version of iTunes is version 12.5.1. Make sure you have it installed on your computer before proceeding with other steps.
Step 2: Now with latest version of iTunes installed on the computer, take your iPhone 7 or iPhone 7 Plus and plug it into your Mac or PC via the supplied Lightning cable.
Step 3: Now power down your iPhone 7 as you normally would by pressing and holding the power/lock button until the slide to power off prompt appears. Slide it to turn it off.
Step 4: Once the phone is turned off, press and hold the power/lock button on the right side of the iPhone 7 or 7 Plus for a period of 3 seconds. With the power/lock button still pressed, press and hold the volume down button on the other side of the iPhone. Keep holding both buttons down together for approximately 10 seconds.
Step 5: After approximately 10 seconds, release the power/lock button, but make sure that you continue to keep the volume down button held down for another 5 seconds.
If you either see the Apple logo appear on the screen, or if you see the iTunes logo with Lightning cable appear on screen, then you have held the volume down button down for too long. In either instance you will have to re-start the process again.
Step 6: If you nail the timings, the display will remain all black, confirming that the device has entered into DFU mode successfully. iTunes will also confirm this with a message.
Now that the hardware has successfully been put into DFU mode, you should be able to run through the usual process of actually restoring it if required. If at first you don’t succeed, make sure to keep trying again as it will take a little while to get used to the new method.