Blog Archives
![How To Fix Kodi Startup Crashes [2018 Guide]](https://findtutorial.wordpress.com/wp-content/uploads/2018/02/kodi-broken.jpg?w=90&h=70&crop=1 "How To Fix Kodi Startup Crashes [2018 Guide]")
How To Fix Kodi Startup Crashes [2018 Guide]
It stands to reason that in order to enjoy everything that Kodi is capable of and to get some of the best add-ons and content accessible through the media player software, a user needs to be able to actually successfully boot Kodi to completion. Unfortunately, due to reasons which are sometimes not immediately known, this isn’t always possible to do.
Below, you will find a list of some of the common reasons why you won’t be able to successfully boot Kodi up to completion, which should point you in the right direction to solving any issue you might have. The fixes listed applies to Windows 10, Android, Mac and even iOS.
Upgrade Kodi: This generally goes without saying for a lot of software but you should always ensure, where possible, that you are running the latest version of the platform, which, in this instance is Kodi. Certain add-ons and additional installations can be updated to offer compatibility with only the latest version, and therefore cause problems or crashes.
Operating System Patches: Having the latest version of Kodi may not solve the problem but having the latest operating system patches could just be the final piece of the puzzle. Make sure that any available OS patches are immediately installed.
Add-on Installation from Official Repo/Sources: It’s probably fair to suggest that each add-on installed to Kodi is likely going to be available from a variety of sources. With that said, each add-on typically only comes with one official repository or source so it’s important to make sure that it’s obtained from the correct and official place to ensure maximum stability and reduce the likelihood that it’s crashing Kodi.
Kodi Downgrade: It’s unfortunate to admit but even brand new versions of Kodi released to offer new functionality or improvements can end up causing random and sporadic start-up crashes. When this happens, there are few things you can do other than try an initial reboot of the system before ultimately rolling back or downgrading to the previously working version if the problem is continuously persisting.
New or Updated Add-ons: This is likely going to be one of the most common causes of start-up crashes on Kodi. The system itself can be highly stable but if an add-on is updated by a third-party developer, and it hasn’t been tested properly, then it can cause a myriad of problems. If you are having continuous problems with a specific add-on, and you know which addon it is, you can access the Kodi installation’s userdata folder followed by the addon_data folder and proceed to removing the relevant plugin and its contents.
The path to these folders will vary between the platform Kodi is running on.
- iOS: /private/var/mobile/Library/Preferences/Kodi/userdata/
- Android: Android/data/org.xbmc.kodi/files/.kodi/userdata/
- Mac: /Users//Library/Application Support/Kodi/userdata/
- Windows: Hit the Start button and type in the following command followed by hitting the Enter key on your keyboard: %APPDATA%\kodi\userdata\
- Linux: ~/.kodi/userdata/
Antivirus: This probably isn’t going to be an immediate problem on a lot of platforms but it could be an issue for those who have Kodi installed on Windows machines. On occasion, it has been known for the live filesystem protection feature of specific antivirus software packages to cause crashes immediately when Kodi starts up, or after a small period of time when it’s running. The features, protection level, and behaviors will differ from antivirus to antivirus, so it’s worthwhile checking all aspects of what you have installed.
Disable Auto Updates: Make sure you keep auto updates disabled, so that once you proceed with a manual update, you would be in a better position to point out and trace where the problem may reside in case startup crashing does occur. You can do this by selecting the ‘Settings’ icon, and navigating to System settings > Add-ons > Updates. Here simply select the “Notify, but don’t install updates” option.
Re-install Kodi: Of course this is when all else fails. You may wish to keep a record of all the repos and add-ons you have installed before you proceed with uninstalling Kodi, however, there’s one important step that you don’t want to miss. Once you’ve uninstalled Kodi, make sure to remove the userdata folder of your Kodi installation. The path to this folder has been pointed out earlier in this post under the New or Updated Add-ons header above. This will ensure that any problematic add-on or line of script causing issues, does not carry over to a fresh Kodi install.


How To Fix Failed To Install A Dependency Error In Kodi 17 / 17.6 Krypton
Here’s how to fix Kodi Failed to install dependency error in Kodi version 17 or 17.6 Krypton 2018 edition running on a compatible platform.
If you have a Kodi installation and have been experiencing errors around failing to install a dependency when installing addons, then you are probably at the end of your tether trying to not only work out the cause of the problem but also fix it. If you are infuriated with this problem and are running Kodi 17 / 17.6, then carry on reading for what will hopefully be an immediate fix to your problem.
Step 1: With the Kodi installation open, click or tap on the gear icon to head into Settings. You will then need to head across and select the File manager option.
Step 2: When inside of the File manager, double-click on Add source and then select the entry field which will contain the wording <none>. This will let you enter the details of the source in. Enter the following: http://fusion.tvaddons.ag and select OK.
Step 3: Use the Enter a name for this media source option to give it a name of your choosing. Select OK again. You can now navigate back to the main Kodi home screen.
Step 4: On the main home screen, select the Add-ons option from the main menu system. In the top left-hand corner select the box icon which represents the Add-on Browser.
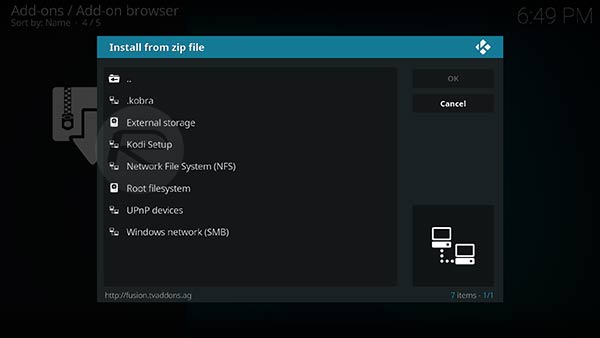
Step 5: Select the Install from zip file option and then select the media source based on whatever you called it in Step 3 above.
Step 6: Select kodi-repos and then english. Scroll down until you find the repository called repository.xbmchub-1.0.7.zip. Select it.
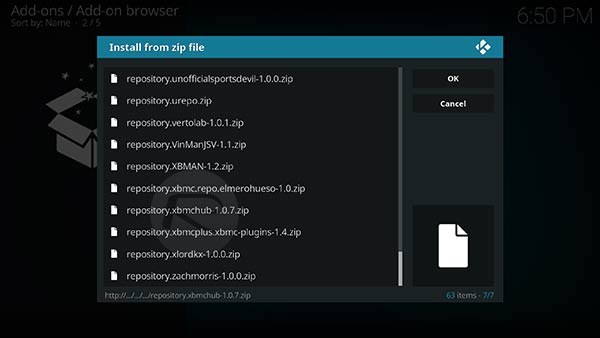
You then need to wait until Kodi gives you a notification saying that the Add-on has been installed.

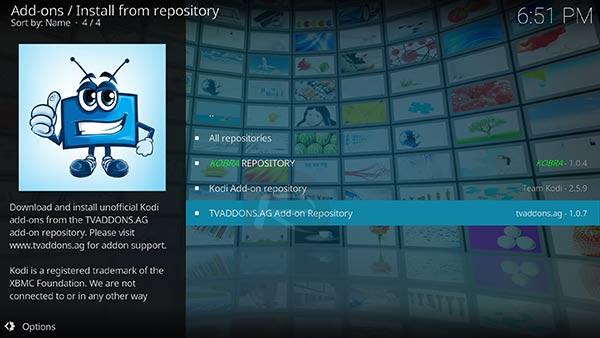
Step 7: Now, select the Install from repository option and choose the TVADDONS.AG Add-on Repository option. Select Program Add-ons, and then select Indigo.
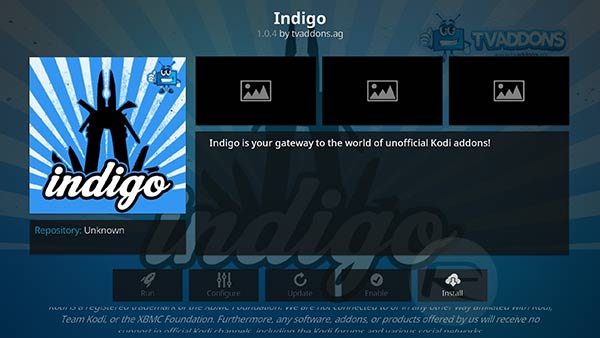
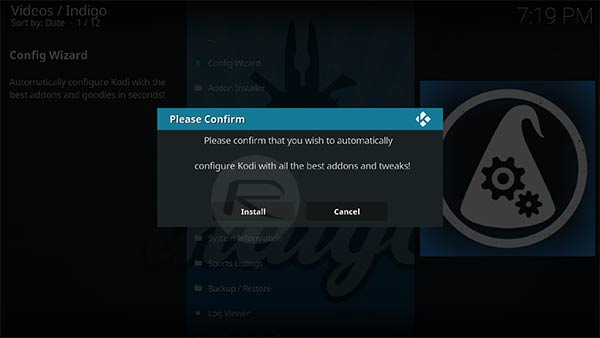
Step 8: When the Indigo page is brought up, select the Install option at the bottom of the interface. When it is installing, select the Config Wizard option and repeat the same installation process.
Step 9: Move back to the root of the Add-ons section and select Indigo and then select Config Wizard and select Install.
Step 11: Once that is actually installed by Kodi, you will then need to restart Kodi and you should be good to go without experiencing any of the problems that previously were in place.
Update: With http://fusion.tvaddons.ag repo now dead, you can try http://fusion.tvaddons.corepo in its, or more specifically our updated Indigo guide here.

How To Install Kodi Indigo Addon In 2017
Is Kodi Indigo (Fusion) addon not working for you? Here’s how to install it in 2017 on Krypton 17 the right way.
Any experienced Kodi user will already be aware that there are tons of wonderful add-ons available for Kodi, all of which have their own little slant and offer their own take on things. The Indigo add-on is slightly different to most in that it allows a user to perform certain administrative tasks, such as adding and removing add-ons, tweaking certain elements of Kodi to try and get the best performance, and evening being able to instantly view event logs for troubleshooting purposes.

It’s evident from its functionality that the Indigo offer won’t really appeal to every single Kodi user, but it will definitely to those who like to maintain control over their installation. Check out the steps below to get up and running with it right away.
Enable Unknown Sources
Step 1: Load up the Kodi installation on whatever hardware you are running. Select System Settings and choose Add-ons.
Step 2: Within the Add-ons section you will see an option called Unknown sources with a toggle option next to it. Make sure that it toggled into the On position.
Install Indigo (Fusion) Kodi Add-on
Step 1: We are going to need to get the right source in place before we can access all of the content. Select System settings and then File manager. When inside of File manager you will need to choose the Add source option.
Step 2: Tap into the part of the interface that allows you to add the source URL. This will be denoted by a placeholder shown as <None>. Enter the following URL and select OK: http://fusion.tvaddons.co
Call the repository .fusion2 (or any other name of your choice) and select OK.

Step 3: Head back to the Kodi main menu and select Add-ons. Select the open box icon at the top of the interface and select Install from zip file.
Step 4: Select .fusion2, followed by selecting begin-here > plugin.program.indigo-#.#.#.zip.
That’s it! Once the add-on is installed, head back to the main menu Add-ons section and load up the Indigo add-on.

A first time opening will ask you to install some additional files, so just click yes on that to progress. You should be free to use it now.

How To Downgrade iOS 11.2.5 To iOS 11.2.2 For Potential Future Jailbreak
Here’s how to downgrade iOS 11.2.5 to iOS 11.2.2 on iPhone or iPad in preparation for a potential future iOS 11.2.2 jailbreak.
If you thought you were perfectly happy running iOS 11.2.5 on your iPhone or iPad until you heard about the potential for an iOS 11.2.2 jailbreak, then you will be pleased to know that it is still possible to downgrade while Apple is still signing that firmware version. Follow the process below to do exactly that. Make sure your data is backed up though but do remember that full backups made using iTunes or iCloud on 11.2.5 won’t be compatible for restore on iOS 11.2.2.

Step 1: First and foremost, you are going to need to have the latest version of iTunes running on your Mac or PC. You can grab this via the Update mechanism in the software itself, or by heading to apple.com/itunes/download/ and downloading the latest version for your platform. You are also going to need to have the correct iOS 11.2.2 IPSW for your iPhone or iPad. You can grab the relevant IPSW file for your device from here: Download iOS 11.2.2 IPSW Links And OTA For iPhone, iPad, iPod touch. Once done, proceed to step 2 below.
Step 2: Launch the Settings app on the iPhone or iPad and head to iCloud > Find My iPhone and ensure that this functionality is toggled into Off position.
Step 3: Now, with those two things done, it’s time to connect the device to the PC or Mac using the supplied Lightning cable. You also need to put the device into DFU or Recovery Mode. If you don’t know how to do that, then you can find the process below for your device type:
- iPhone 7 or iPhone 7 Plus owners: Enter DFU Mode On iPhone 7 Or iPhone 7 Plus, Here’s How
- iPhone 8, iPhone 8 Plus, or iPhone X owners: DFU Mode On iPhone X / 8: Here’s How To Enter It
If you are still running an older device, such as iPhone 6s or iPhone 6 Plus, then you can use the old-school method of getting into DFU Mode, which involves holding down the Power and Home buttons together for ten seconds until the Apple logo appears and then releasing the power button while continuing to hold down the Home button until iTunes tells you that it has detected a device in Recovery Mode.
Step 4: You now need to be back concentrating on the Mac or PC. If you are using a Mac, hold down the Option key on the keyboard and click on the Restore iPhone… button in iTunes. If you are operating a Windows-based PC then it’s the Shift key that you need to hold down while clicking on the same Restore iPhone… button. Once prompted, select the relevant IPSW file from your computer.

iTunes will then go about its business getting that iOS 11.2.2 IPSW file installed on your connected device. Once it has finished, you will be left with a device running a clean installation of a firmware which will hopefully be jailbroken sooner rather than later using one or more of the Zimperium bugs when they become common knowledge.

How To Put iPhone X / 8 In DFU Mode
Here’s how you can easily enter DFU mode on iPhone X or iPhone 8 when the need arises. Instructions include step by step illustrations.
It’s probably fair to suggest that most iPhone owners who have owned that particular device over time will be familiar with putting the device into DFU (Device Firmware Upgrade) mode. As the name suggests, this mode on the device is particularly useful when wanting to troubleshoot a device or have to go through the process of updating the firmware on the iPhone.

With the announcement and release of iPhone 8 and iPhone 8 Plus, as well as the iPhone X which does away with the Home button completely, the process has changed compared to what it was on previous-generation iPhone models. So without further ado, let’s just dive right in and take a look at the necessary steps to do this, which differ slightly from the previously amended steps for iPhone 7 and iPhone 7 Plus. Make sure to familiarize yourself fully with the process before running through it.
NOTE: Before beginning, you are going to need to have an iPhone 8, iPhone 8 Plus, or iPhone X smartphone as well as access to iTunes running on a PC or Mac and the Lightning cable to connect it to the machine.
Step 1: Make sure that you connect your iPhone 8, iPhone 8 Plus, or iPhone X to a Mac or PC via the provided cable. If iTunes doesn’t automatically launch, then invoke it manually.
Step 2: Make sure iTunes is still running and your iPhone is still plugged into the machine before turning the iPhone entirely off.
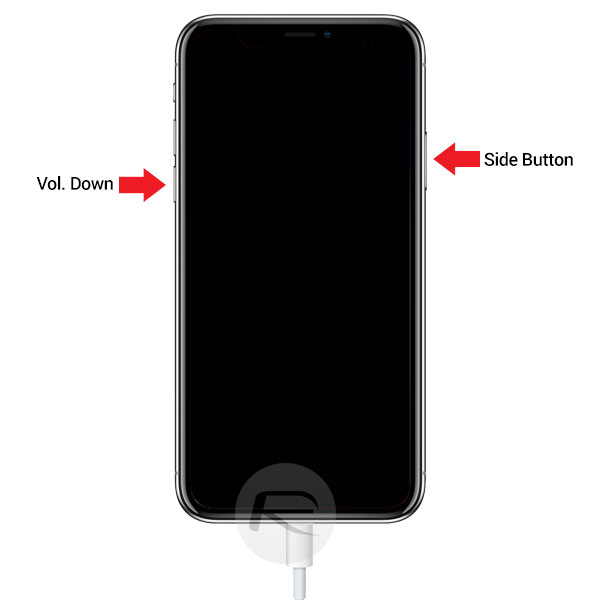
Step 3: Now, press and hold the Side button on the device for three seconds. You should get the Apple bootup screen. With the Side button still held down press the Volume Down button and hold both buttons down for a period of ten seconds.
Step 4: The bootup screen should disappear once the system has detected that these buttons are pressed for a specific period of time. After ten seconds are complete, release the Side button but continue to press the Volume Down button for an additional five seconds. iTunes should pop up an alert informing that it has found a device in Recovery mode. The iPhone screen should be entirely black at this stage.
Congrats! You have now successfully put your iPhone 8, 8 Plus, or iPhone X into DFU mode.

Enter DFU Mode On iPhone 7 Or iPhone 7 Plus, Here’s How
Here’s how you can enter DFU mode on an iPhone 7 or iPhone 7 Plus. As you may already know by now, Apple’s iPhone 7 and iPhone 7 Plus features a new capacitive Home/Touch ID button that uses the company’s proprietary Taptic Engine to provide feedback when an action has been complete instead of being mechanical like on previous iPhones.
This new Home button integration means that the process of putting both devices into DFU mode has changed slightly to accommodate the removal of the mechanical button. We’re going to run you through the new DFU mode process to allow you to familiarize yourself for when the need arises.

Step 1: First and foremost, you’re going to need to ensure that you have the latest version of Apple’s iTunes installed on your Mac or Windows-powered PC. This is something that a lot of people forget about and think that iTunes isn’t really that important. As of this writing, the latest version of iTunes is version 12.5.1. Make sure you have it installed on your computer before proceeding with other steps.
Step 2: Now with latest version of iTunes installed on the computer, take your iPhone 7 or iPhone 7 Plus and plug it into your Mac or PC via the supplied Lightning cable.
Step 3: Now power down your iPhone 7 as you normally would by pressing and holding the power/lock button until the slide to power off prompt appears. Slide it to turn it off.
Step 4: Once the phone is turned off, press and hold the power/lock button on the right side of the iPhone 7 or 7 Plus for a period of 3 seconds. With the power/lock button still pressed, press and hold the volume down button on the other side of the iPhone. Keep holding both buttons down together for approximately 10 seconds.
Step 5: After approximately 10 seconds, release the power/lock button, but make sure that you continue to keep the volume down button held down for another 5 seconds.
If you either see the Apple logo appear on the screen, or if you see the iTunes logo with Lightning cable appear on screen, then you have held the volume down button down for too long. In either instance you will have to re-start the process again.
Step 6: If you nail the timings, the display will remain all black, confirming that the device has entered into DFU mode successfully. iTunes will also confirm this with a message.
Now that the hardware has successfully been put into DFU mode, you should be able to run through the usual process of actually restoring it if required. If at first you don’t succeed, make sure to keep trying again as it will take a little while to get used to the new method.

How To Install Tweaks On iOS 11.1.2 Electra Jailbreak Without Cydia The Easy Way
If you have jailbroken your iOS 11.x.x iPhone or iPad using Electra, or another compatible jailbreak, then you may be slightly perturbed to find that it doesn’t come with the installation of Cydia.
Under normal circumstances that would cause a lot of device owners to be hamstrung and to not be able to get any tweaks on their devices. However, if you are a Windows user, help is on hand with the release of a Deb file installer and uninstaller called Tweak Installer to assist with that whole process.

If you have recently come into the jailbreak community expecting to receive a jailbreak which is flawless and installs all necessary components without issue, then you are likely a little disappointed. Those jailbreak days, where you get device liberation, Cydia and Substrate installed, appear to be long behind us.
The aforementioned liberation is entirely possible using something like Electra, or LiberiOS, but they won’t install Cydia as part of that process as both Cydia and Substrate are yet to receive any compatibility updates for iOS 11. So, just where does that leave those users from a tweak installations perspective?
Well, those device owners can manually obtain the necessary files directly from the developer or other places, and then go through the process of installing to the device themselves. Or, if they are using Windows, then they could download this new installer/uninstaller which lets them run a desktop app to make a connection over SSH to the iOS device in question. It then unpacks and installs the Deb files directly to the device and gets them installed over-the-air with minimal fuss. The developer has also added the ability to go the other way, which allows the user to remove the installed tweak(s) as well with just a single click.
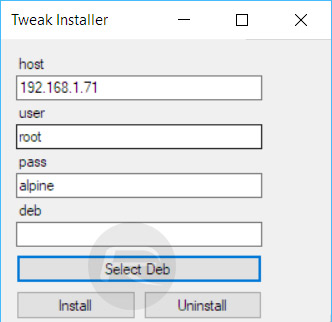
For now, this tool is only available on Windows, with macOS and Linux versions said to be coming soon. Additionally, it seems that the developer is also interested in developing an on-device Deb installer to make the whole thing a little more seamless which removes the need for that SSH connection to the device from a computer.
If you are interested in giving this a whirl on Windows, then you can grab the latest beta of the software from here.

How To Buy Bitcoin From iPhone Or Android Device The Easy Way
Barely a day goes by right now without someone bringing up the subject of Bitcoin, and with values hitting all-new highs of late, it is easy to understand why so many people are asking about the cryptocurrency.
While Bitcoin is so popular and, importantly, so valuable, there will always be people looking to get in on the ground floor and see what all the fuss is about. Thankfully, that is fairly easy to do, and it can all be done from your smartphone.
Whether you are using an iPhone or an Android device, Coinbase is an app and service that will make it as easy as possible to get started with Bitcoin. Whether you are dipping your toe in or taking things to the next level, Coinbase should have what you need. Here’s what you need to do.
Step 1: Open Safari or Chrome and sign up for Coinbase using the link here. Verify your identity. Yes, we know Bitcoin is supposed to be all private and such, but if you want an easy way in, this is the price you pay. The process will differ depending on your country of origin, too.
Step 2: Download the Coinbase app from either the App Store or Play Store.
Step 3: Once all verified, you will need to connect your bank account to Coinbase. Again, the process will be different depending on where you live, but if you’d prefer to use a credit card or debit card, you can – just be aware the limits may be lower.
Step 4: Buy your first Bitcoin. It may take a little while for your identity to be confirmed, but once that has happened, going to the Coinbase home screen will show you the current price. Tapping the Buy button leads to entering the amount of Bitcoin you want to buy. Now just select the wallet you want the Bitcoins dumped into and away you go.
Step 5: This is an optional step, but if you want to sell Bitcoin, then simply tap on Sell from the Coinbase home screen. You’ll need a bank account connected in order to withdraw your cash, but once you tell the app how much you want to sell, you’re all done.

Just remember folks, Bitcoin can go down in value as well as up; there really is no such thing as a free lunch.
Install PlayStation Mobile Store On Your Rooted Android Device [How-To]
PlayStation Mobile has just been released for Android, but as often the case with Sony, only certified devices have been able to enjoy the new app. Owners of the Read the rest of this entry

Run Google Maps Web App In Full-Screen With Original Icon On iPhone 5 / iOS 6
Although you can bookmark Google Maps on your iOS 6-running device’s home screen, but the experience is somewhat hampered since the web app opens Read the rest of this entry
