Blog Archives

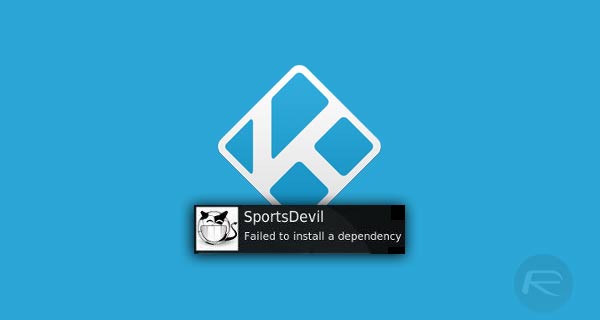
How To Fix Failed To Install A Dependency Error In Kodi 17 / 17.6 Krypton
Here’s how to fix Kodi Failed to install dependency error in Kodi version 17 or 17.6 Krypton 2018 edition running on a compatible platform.
If you have a Kodi installation and have been experiencing errors around failing to install a dependency when installing addons, then you are probably at the end of your tether trying to not only work out the cause of the problem but also fix it. If you are infuriated with this problem and are running Kodi 17 / 17.6, then carry on reading for what will hopefully be an immediate fix to your problem.
Step 1: With the Kodi installation open, click or tap on the gear icon to head into Settings. You will then need to head across and select the File manager option.
Step 2: When inside of the File manager, double-click on Add source and then select the entry field which will contain the wording <none>. This will let you enter the details of the source in. Enter the following: http://fusion.tvaddons.ag and select OK.
Step 3: Use the Enter a name for this media source option to give it a name of your choosing. Select OK again. You can now navigate back to the main Kodi home screen.
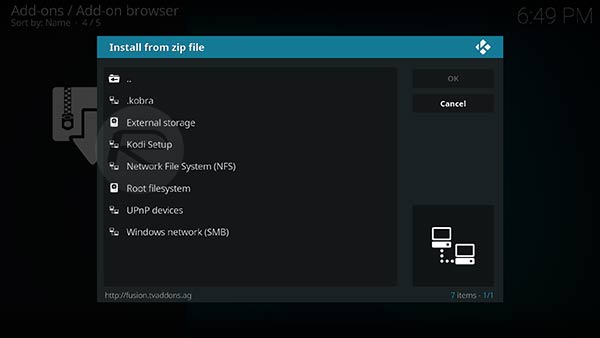
Step 4: On the main home screen, select the Add-ons option from the main menu system. In the top left-hand corner select the box icon which represents the Add-on Browser.
Step 5: Select the Install from zip file option and then select the media source based on whatever you called it in Step 3 above.
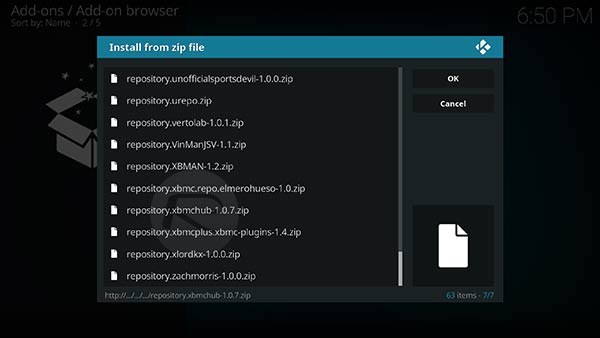
Step 6: Select kodi-repos and then english. Scroll down until you find the repository called repository.xbmchub-1.0.7.zip. Select it.
You then need to wait until Kodi gives you a notification saying that the Add-on has been installed.

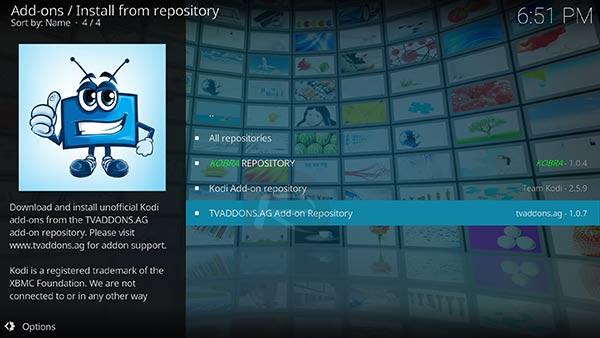
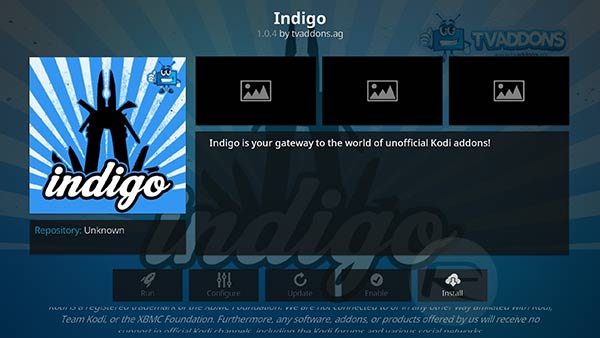
Step 7: Now, select the Install from repository option and choose the TVADDONS.AG Add-on Repository option. Select Program Add-ons, and then select Indigo.
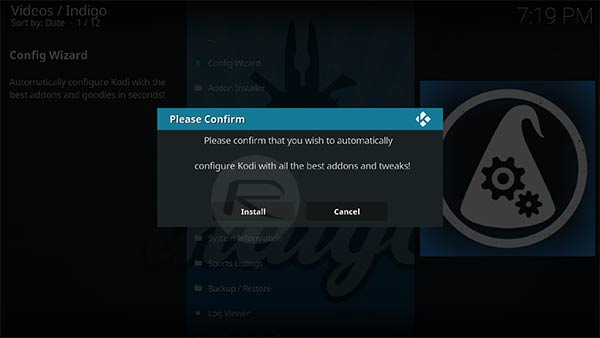
Step 8: When the Indigo page is brought up, select the Install option at the bottom of the interface. When it is installing, select the Config Wizard option and repeat the same installation process.
Step 9: Move back to the root of the Add-ons section and select Indigo and then select Config Wizard and select Install.
Step 11: Once that is actually installed by Kodi, you will then need to restart Kodi and you should be good to go without experiencing any of the problems that previously were in place.
Update: With http://fusion.tvaddons.ag repo now dead, you can try http://fusion.tvaddons.corepo in its, or more specifically our updated Indigo guide here.

SAM Update Makes Unlocking Your iPhone Much Easier
Sam Bingner has released an update to SAM that makes unlocking your iPhone even easier. The new method does not require your original SIM or iTunes.

I just pushed an update for SAM-Put in SIM you want to work, select orig carrier (or auto), click “Try Activation” under “Utils” and done
Easy Step-by-Step tutorial can be followed to unlock iPhone using the recent SAM update.
Bingner also notes that he will be updating SAM with the ability to save unlock tickets…
Next up – proper backup support or multiple tickets – then restore support with options. step here
Easy iPhone Unlock Tutorial using Recently Updated SAM
UPDATE: This tutorial is useless now, as Apple as fixed AP Ticket signing services and now SAM technique to UNLOCK iPhone any Baseband is of NO USE.
These are much easier instructions on how to unlock your iPhone using SAM. This method will work with the iPhone 4S, iPhone 4, iPhone 3GS, and iPhone 3G on any jailbreakable firmware including 5.x. The original instructions can be found here.
Step One
Jailbreak your iPhone. You can find instructions on how to do that using this POST.
Step Two
Tap to launch Cydia from your SpringBoard & goto Manage screen.
Step Three
Press the large Sources button.

Step Four
Press the Edit button at the top right of the screen.
Step Five
Press the Add button that appears at the top left of the screen.
Step Six
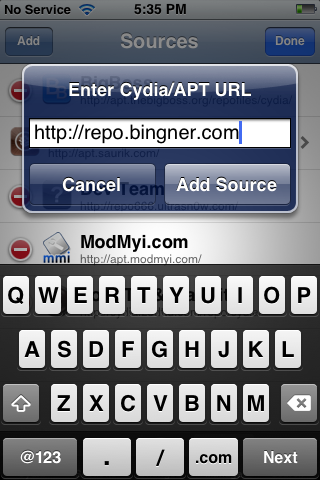
Enter http://repo.bingner.com and press the Add Source button.
Step Seven
Press the large Return to Cydia button when all updates have been completed.
Step Eight
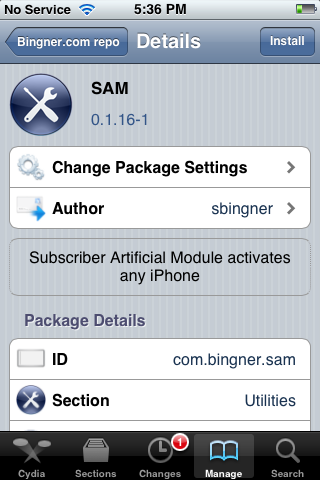
Press to select Bingner from the list of Sources.
Step Nine
Choose SAM from the list of packages.
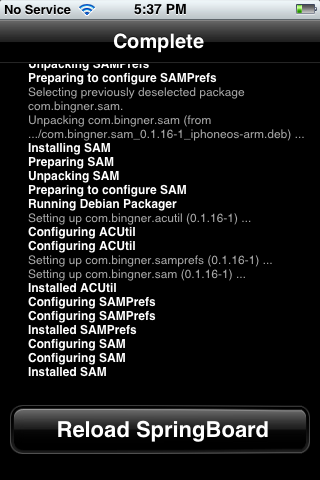
Step Ten
Press the Install button at the top right of the screen. Installation will start after taping Confirm button on top right. Once installation has completed press the large Reload SpringBoard button.
Step Eleven
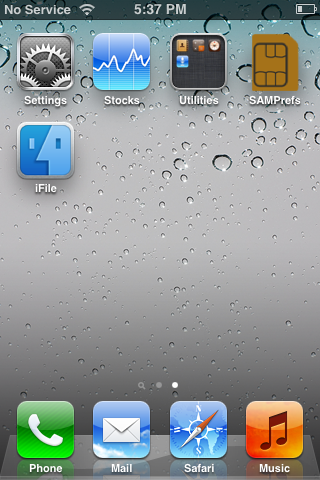
Insert your new SIM card and tap to select SAMPrefs from your SpringBoard.
Step Twelve
Make sure your Method is set to Auto Detect and tap Utilities. Note**: If Auto-Detect doesn’t work you can change Method to By Country and Carrier and select the phone’s ORIGINAL carrier manually.
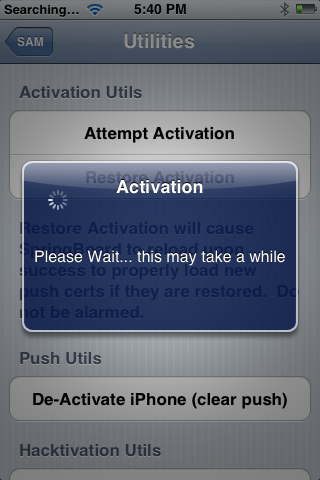
Step Thirteen
Press the Attempt Activation button. If you don’t see Attempt Activation then select De-Activate iPhone and theAttempt Activation button should appear.

Step Fourteen
A popup will appear letting you know that “this may take a while”.
Step Fifteen
Eventually your iPhone will respring and after searching for a bit your new network will be detected!

Step Sixteen
You should now backup your iPhone unlock ticket in case this method is ever blocked. You can find instructions on how to backup the unlock ticket here.
IMPORTANT:
Your phone will work normally with your SIM card and that SIM card ONLY since we have tricked iTunes to think that ICCID is one of the intended carrier’s. The phone can be rebooted and connected to iTunes freely without losing the “unlock”, at least for now.
A big thanks to Sam Bingner, Loktar_Sun and Laforet for their contributions!

Backup Your iPhone’s Unlock Activation Ticket The Easy Way Using Redsn0w
Weekends are usually slow with regards to tech news, but those interested in unlocking their iPhones have been pleasantly surprised with the revelation that all basebands and firmware versions can be carrier unlocked – provided of course that said device is jailbroken.
As you might expect, the bingner Cydia repo facilitating the method has been almost ground to a halt by those looking for an unlock. The significance of the SAM unlock cannot be underestimated, and with users seemingly prepared to pay hundreds for a permanent solution through CutYourSim, nobody could have foreseen such a simple, effective (and free) method releasing to the public in this manner.
Indeed, basebands and firmware versions are often mitigating factors of whether a device can be unlocked, but thanks to the work of Loktar_Sun and Sam Bingner, iPhone users have been well and truly blessed today. A good day for the Cydia-based community is never complete without some intervention from the iPhone-Dev Team, though, and the team has released an update to its Redsn0w jailbreaking tool allowing users of the SAM unlock tool to back up their activation tickets for safekeeping.

As per the tutorial detailing the steps of the SAM unlock, users were required to manually backup activation tickets, but in this one-click culture, Redsn0w has made things even easier. Now at version 0.9.10b8, which is linked to at the bottom of this post, it houses the ability to backup arbitrary directories or files into a zip file on your Mac or PC.
Here’s the short, simple, three step guide to help you along the way:
Step 1: Make sure your device has the afc2 service enabled. Most jailbreaks cater to it, but if not, you can grab it from the ModMyi repository in Cydia.
Step 2: In the new Redsn0w, navigate through Extras > Even More > Backup

Step 3: That’s pretty much it. By default, Redsn0w will backup your activation records from /var/root/Library/Lockdown, and without going into too much detail, it leaves your device’s future unlock status in good stead.
The iPhone Dev Team has promised to comment on the SAM unlock, and in jailbreak terms, it’s almost like waiting for an official press release! We’ll be sure to reveal all once that info does surface, so stay tuned here at Redmond Pie!
Download RedSn0w 0.9.10 beta 8 for Windows
Download RedSn0w 0.9.10 beta 8 for Mac
Source: RedmondPie(DOT)com

How To Unlock Any Jailbroken iPhone On Any Baseband And Firmware
It seems that jailbreakers and potential unlockers are having to wait longer and longer for news to cheer about as the cat and mouse game with Apple and the networks becomes more and more difficult for those involved in producing jailbreaks and iPhone unlocks. Once upon a time, when a new firmware was released, it didn’t seem to take that long for the development teams to pull something together to release to the public, but as time progresses it also seems that the difficulty levels involved in this kind of work is increasing dramatically.
With that in mind, the news this morning, brought to the attention of the masses by iPhone Dev-Team leader MuscleNerd, should certainly raise a smile on the faces of those who require a network unlock on their jailbroken iPhone. MuscleNerd has confirmed that a Chinese researcher by the name of Loktar_Sun has discovered a method for unlocking jailbroken iPhones with the help of the Subscriber Artificial Module (SAM) by Sam Bingner.

The release of the method comes after the researchers and developers involved delved deeper into the possibilities that the SAM package provided, something that MuscleNerd himself concedes he and his team didn’t do effectively. To proceed with the unlock, users will need a few things which are detailed below. It is also worth noting that this unlock method produces a ticket that is valid only for the SIM card that is used during the procedure, meaning that if you have additional SIM cards that you wish to use in the unlocked iPhone, you will need to repeat the process with each SIM.
Requirements: Before following this procedure, users will need to have a jailbroken iPhone that is not listed on any IMEI blacklists. A computer with a fully working internet connection and the latest version of iTunes installed is also required, as is the original carrier information of the locked device in question.
Step 1: Open up Cydia on the jailbroken iPhone and add the official repository for the SAM package. The repo URL is http://repo.bingner.com and contains the official up to date SAM package and the required dependencies.

Step 2: Launch the SAM interface. This can be achieved by tapping the SAMPrefs icon that can be found on your Springboard, or by finding the SAM preferences bundle through the Settings.app. Make sure that the SIM card that you intend to use is present in the iPhone.
Step 3: After SAM has been launched, select the ‘Utilities‘ option before selecting ‘De-Activate iPhone‘. If this has been done correctly, the device ActivationState should now read as ‘Unactivated‘.
Step 4: Keep SAM enabled and choose ‘By Country and Carrier‘ in the Method options. The next step is to find your carrier in this list. Be aware that some networks work with more than network ID, therefore meaning users may need to select the ‘SIM ID‘ option.
Step 5: Head on over to ‘More Information‘ and make a note of the IMSI that is present in the ‘SAM Details‘ section before tapping ‘Spoof Real SIM to SAM‘. Head back to the main SAM screen and change ‘Method‘ to manual and paste or enter the IMSI string that you should have made a copy of.
Step 6: The next step is to connect the iPhone to the computer using the supplied USB cable and allow iTunes to re-activate the phone. When done, double click the Phone Number section of the device details and make sure that the displayed ICCID matches that found on the SIM card. If the strings do not match, the process will need to be repeated from the beginning.

Step 7: If the strings match then unplug the device and disable the SAM package. Re-connect the device to iTunes and do not be alarmed by any error messages that may pop-up saying that the device cannot be activated. This error is normal and requires iTunes to be shut down and then re-opened.
Step 8: After a short period of time, the iPhone should display those beautiful signal bars meaning that the process has been successful. If you find that push notifications have ceased working, this can be resolved by selecting the ‘Clear Push‘ option in SAM and then connecting the device to iTunes.
As mentioned earlier on, following this procedure means that the iPhone will only work with the SIM that was used during the unlock process. If you intend on using multiple SIM cards with the unlocked iPhone then the process will need to be repeated with each SIM on an individual basis. The team involved in producing this unlock have also recommended it as good practice to make a manual save of each ticket that is generated due to the fact that it could prove crucial going forward.
Manually saving each valid unlock ticket
Step 1: Run through Steps 1-8 above for each required SIM card, making sure that the method is successful each time.
Step 2: SSH into the jailbroken device using something like iFile or a desktop client.
Step 3: Navigate to /var/Root/ibrary/Lockdown and make a local copy of everything that is found in that directory for each SIM card.
There you have it, a somewhat lengthy but extremely worthwhile method to unlocked a jailbroken iPhone using the SAM package. Enjoy the freedom.
Control Your iOS Device’s Brightness By Swiping Your Thumb On The Status Bar With SwipeBright
If you are anything like me, then you will appreciate the little Cydia tweaks that bring small changes to the way iOS operates, as well as finding yourself drawn to extensions that enhance the visual appearance of the OS in subtle but noticeable ways. Don’t get me wrong here, the larger more-in-your-face tweaks obviously have their benefits, and can be extremely helpful to some people, but it tends to be the more intricate, small and useful packages that stand the test of time.  The SwipeBright tweak that has found its way onto Cydia is a prime example of one of these simple but extremely useful tweaks and is an implementation of the brightness controls that I personally have been waiting for. When installed, SwipeBright simply allows the user to control the level of the display’s brightness by making a simple left and right swipe gesture directly onto the status bar at the top of the display. The gestures are there to represent an actual swipe on the brightness slider, meaning that a right-hand (left to right) swipe on the status bar will increase the brightness whereas a left (right to left) swipe will produce the opposite result and dim the display’s brightness. Although not really required, SwipeBright installs with its own configurable preferences bundle directly within the native Settings app. The first of these settings allows the user to simply toggle the tweak on or off, something which I am an advocate for and believe all Cydia tweaks should come with. The second option allows users to restrict the tweak to the home screenonly, meaning that SwipeBright would only be active when one of the user’s home screen is visible. If this option is set to off then the tweak can be invoked via the status bar whilst inside an app and at the device’s lock screen, as well. The third and final option relates to the tweak’s Deadzone sensitivity, and refers to how sensitive the status bar actually is to sliding. When the sensitivity slider is set to a higher level, the user will need to slide their finger more to invoke the tweak and vice versa.
  SwipeBright is one of those useful but minimalistic tweaks that looks to be very well implemented and something most users will find useful. The only issue that I experienced, was needing to set an alternative Activator option for SBSettings due to the fact that it used a left swipe on the status bar to activate the drop down. SwipeBright is available from the BigBoss repository at a cost of $0.99 and is compatible with iOS 4 and above.
Replace The iOS Lock Screen Clock With Live Weather Updates Using Forecast
For those jailbroken iOS users who may find the whole lock screen experience a little bit bland, boring and outdated, then the Forecast tweak might be something which would appeal to you. Users of Android devices certainly have the bragging rights when it comes to interactive and engaging lock screens, something that iOS users will be forgiven for being just a little bit envious.
![]()
The Forecast tweak, one of the latest from developer Stimpy5050, brings with it a small change to the device’s lock screen by totally removing the familiar time and date snippet that appears at the top of the display and replacing it with a native looking weather widget that users may recognize from the Notification Center pull-down menu.
After installation, Forecast does not come with any additional home screen icons or configurable settings entries. The tweak is activated by default when installed, meaning users will need to remove the package entirely through Cydia if they wish to go back to the old time and date display. One of the great things about Forecast is the native aesthetics that it offers and certainly doesn’t look out of place when displayed on the lock screen.
When installed, the Forecast tweak will use the local weather system to pull up weather information including the current temperature, as well as high and low forecasts for the day. The time and date are also displayed on the left hand side of the widget, as well as a very well crafted image that shows the local conditions visually.

By default, Forecast refreshes itself after every fifteen minutes, but it does have a refresh option on the bottom right hand corner which allows users to to manually update the weather. One of the benefits of the fifteen minute refresh is that the tweak will not use a great deal of cellular data should no Wi-Fi connection be available. It also means that it shouldn’t have a great or an adverse effect on battery life, considering the tweak won’t be constantly requiring attention.
Forecast is definitely a nice little option for those who want a change from the standard iOS lock screen experience, and the native implementation means it fits in perfectly with the rest of iOS. Forecast is available from the ModMyi repository for an introductory price of $0.99 before rising to an unspecified full price.
Source: RedmondPie(DOT)com
FaceTime QuickPick For iOS Gives You Lighting Fast Access To FaceTime Contacts And Initiate Calls
The FaceTime video calling service which Apple introduced with the release of the iPhone 4 has proved to be a somewhat hit and miss. It goes without saying that a large number of users find the ability to make free of charge video calls over a Wi-Fi connection a huge benefit. But, a lot of users have also found FaceTime to be a little confusing, and very limiting due to the fact that it actually requires both devices to be connected to Wi-Fi, unless, of course certain jailbreak tweaks are installed to bypass that requirement.
![]()
We have seen very few FaceTime related packages on Cydia which focus purely on enhancing and modifying the FaceTime experience on iOS devices, but an iOS developer known as tripkip has released a tweak called FaceTime QuickPick, which is a good attempt at making the video calling experience a little bit easier for users. The QuickPick tweak is essentially a package that provides quick and efficient access to contacts which are capable of receiving FaceTime video calls, meaning that users can access and call them in a quick and easy manner.
Any tweak which shortens a process – or in general; makes an aspect of iOS a little bit simpler to use – usually prove to be quite popular, and that notion stays true if we’re talking about this tweak alone. After installation, FaceTime QuickPick has a very native and familiar looking user interface that doesn’t look alien on your iOS device. Inside of the QuickPick tweak, users can quickly and efficiently invoke FaceTime calls via phone numbers and email addresses.
The tweak also allows additional contacts to be added for FaceTime access through the built-in and easily accessible address book, meaning that when FaceTime contacts are added as favorites, they can be accessed without an issue, and calls can be made to those contacts through a simple, single tap.

FaceTime QuickPick is available from the default ModMyi repository for a price of $0.99, and provides no information about iOS versions which are compatible with it, meaning we can safely assume the tweak works with all jailbroken devices with FaceTime capabilities.
Source: RedmondPie(DOT)com
